I recently had the opportunity to test the NIRA Pro Laser at home, and after 90 days of consistent use, I’m excited to share my real wrinkle-reduction results.
How NIRA is Rebuilding My Skin Barrier This Winter

I recently had the opportunity to incorporate the NIRA Pro Laser into my skincare routine, and after using it consistently for the past 90 days, I’m so excited to share my real results — especially because this winter my focus has been on rebuilding and supporting my skin barrier. Cold temps and dry air always leave my skin looking dull, dehydrated, and more prone to fine lines, so I’ve been reaching for tools that work below the surface, not just on top of it. What makes the NIRA Pro so unique is that it uses FDA-cleared, non-ablative laser technology to gently heat the dermis and stimulate natural collagen production, helping skin become stronger, smoother, and more resilient over time — all in a quick, no-downtime treatment I can do at home in just a few minutes a day. It’s become such an easy, cozy step in my nightly routine, and I love that I’m treating the root cause of aging while also giving my winter skin the extra support it needs.
NIRA Skin has kindly offered Curly Crafty Mom followers a 12% discount off any of their products. Simply click HERE for 12% off your entire purchase.
Why It Fits Perfectly Into My Winter Skin-Barrier Routine
-
Helps support long-term skin strength by boosting natural collagen
-
Works below the surface, not just with topical hydration
-
No downtime or irritation — so important for dry, sensitive winter skin
-
Quick 2-minute treatment that’s easy to stay consistent with
-
Professional, FDA-cleared technology at home
-
Gentle enough for delicate areas like around the eyes
-
Designed for real, visible results in about 90 days
-
A seamless addition to my cozy nighttime skincare routine
- App-connected for progress tracking, skincare insights, and rewards
Instead of constantly layering heavier creams this winter, I’ve been focusing on strengthening my skin from within — and this has been such a game-changer for that.
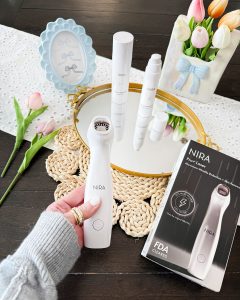
I was also sent the NIRA Pro Laser along with two coordinating skincare products — the Moisture-Lock Hyaluronic Acid Serum and the Youth Renewal Peptide Cream — which I’ve been using to boost my results and add an extra layer of hydration to my winter routine.
Moisture-Lock Hyaluronic Acid Serum: A lightweight, deeply hydrating serum that plumps fine lines and helps enhance my NIRA treatments.
Youth Renewal Peptide Cream: A nourishing peptide cream that locks in moisture, supports collagen, and leaves my skin looking smoother, brighter, and more youthful.
How to Use the NIRA Pro Laser
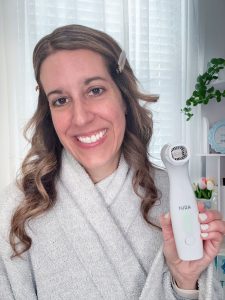
Start with clean skin. Then, power on your NIRA Pro device and start with power level 1. You can build the power level up to 5 once your skin adjusts to the device over time. As long as you feel warmth during treatment, and not pain, you are getting the benefits of the NIRA Pro.


Gently place the tip of the device against your skin and it will automatically deliver the treatment, with two soft beeps letting you know when each spot starts and finishes. Then just glide to the next area and repeat until you’ve treated your full zone. I’m careful not to get too close to my eyes and mainly concentrate on the under-eye area where I want the most smoothing.
After treatment, maximize your NIRA laser results with our Skincare Bundle for smooth, rejuvenated skin. Start by applying 1-2 pumps of our Moisture-Lock Hyaluronic Acid Serum onto the entire face and neck until fully absorbed. Then, apply the Youth Renewal Peptide Cream as the final step in your NIRA skincare routine.
Results
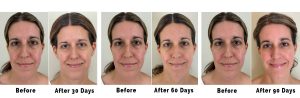 My NIRA Pro Laser front-of-face before-and-after results at 30, 60, and 90 days.
 My NIRA Pro Laser side-of-face before-and-after results at 30, 60, and 90 days.
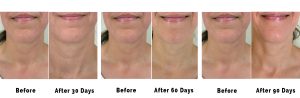 My NIRA Pro Laser neck before-and-after results at 30, 60, and 90 days.
NIRA Skin has kindly offered Curly Crafty Mom followers a 12% discount off any of their products. Simply click HERE for 12% off your entire purchase.